For the Harry Potter Fans...


I've probably mentioned before that my husband is the most difficult person to buy gifts for.  If he needs something, he buys it, and if he wants something, only he really knows which color, size, style, brand, gigabytes of memory etc.  Every once in awhile I get lucky and he'll mention something and I buy it before he does, but it's a pretty rare event. ;)  For Christmas this year I decided to take one of our favorite scenes from Harry Potter and turn it into a sort of love note/piece of art for him. 
 
 "after all this time?" "always."
 
Even if you're not a super nerdy, take yourselves and your two tiny children on a pilgrimage across the United States to see the Wizarding World of Harry Potter in Florida type Harry Potter fan, this is still a pretty sweet sentiment. :)   
 
I made this using my Silhouette for the words and hand cut stencils for the trees and doe.  The font for the words 'after all this time' is actually the font used in the books (I know, it just keeps getting more obsessive! It's Adobe Garamond in case you're interested.) ;)  To make the trees, I cut tree shapes out of brown craft paper and then cut notches in the sides so they'd look like birch trees, just because I like birch trees.  I looked up a picture of a doe and drew her on the craft paper as well, and then cut her out.  I glued the tree stencils down with glue stick (I would've used spray adhesive but I was out!), painted the gray around them, and then peeled the trees off after the paint was mostly dry.  I glued the word stencils on and painted inside of them, once again peeling them off when the paint was dry, and lastly added the doe using the same technique.  I sanded the whole thing lightly to give it a slightly distressed look. 


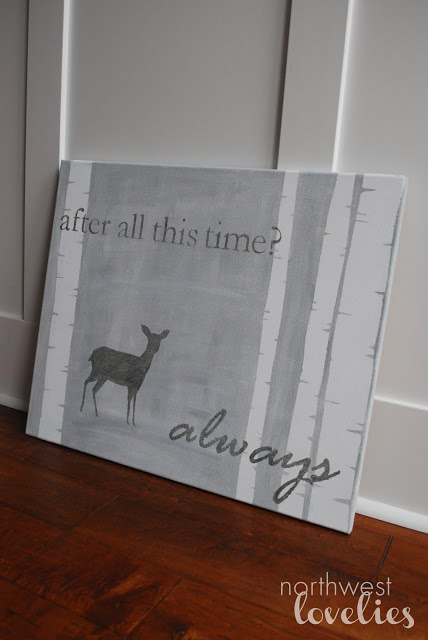
This will go in our bedroom as soon as I decide which wall to hang it on!  Quotes, song lyrics, poetry etc. make for really personal art pieces and great gifts... Valentine's Day is coming up!
 
Jenny
 
 
Linking up to...

Important Dates Art

Well, the cupcake liner L finally had to go.  We had a wedding shower this weekend for my best friend, and it just didn't go with the decor.  As I was making burlap banners for the shower, I came up with the brilliant idea of using burlap to make an important dates sign.  I originally saw the idea here and immediately designed one on the computer, but for some reason the burlap was calling to me and I knew that was the direction I needed to go with this project.
The space for the art is 11 x 14, so I created a document on the computer and printed it horizontally on two pieces of cardstock.  I used the same technique that I do to make burlap banners, and laid the burlap over the cardstock to use as an outline to paint over.  It's really pretty easy to do as long as you use a small angled paint brush.  The whole project took under two hours!

I still miss the fluffy L, but I love how this turned out!
Jenny
 
Linking up to...
Tip Junkie handmade projects Days of Chalk and Chocolate One Artsy Mama Weekend Bloggy Reading Positively Splendid

Mother's Day Canvas Handprints

I have another darling Mother's Day gift idea to share!  I loved this kit from Red Envelope, but I wanted to personalize it with my own colors.  I made Camille's for myself for Mother's Day when she was 14 months old.  I started by painting the 8 in. square canvas dark purple and letting it dry.  The handprint part was slightly stressful, but ended up working really well.  I think I practiced on paper a few times before I put her little hand on the canvas.  When it was time to do Lila's hand, I decided to wait until she was 14 months old too, so we could have both of their hands at the same age (I think hers actually happened at 16 months... oops!). 


I was so worried about the impermanence of these, but recently thought of scanning them into the computer!  If I scan them I can do fun things in Photoshop, not to mention have them saved forever.  I'm always surprised at how fast these little girls are growing up, so I love having these sweet hands to remember when they were small.


Jenny


Linking up to...
One Artsy Mama Whipperberry I Heart Nap Time It's OVerflowing

Guest Room Before and After

Our guest room has come a long way, so I decided it was time to post some before and after pictures!  There are still three or four (or five or six) things I'd like to do, but isn't that always the case?


The bed, dresser, and nightstands got an Annie Sloan Chalk Paint makeover.  I was so excited to find a stockist in downtown Portland.  I actually have to dedicate this project to my friend Kari (from this post!) who went downtown and picked up the paint for me, and then helped me get started! 

I used part Duck Egg Blue and part Old White.  I mixed it using a really scientific formula of 1/3 cup Duck Egg Blue to 1/4 cup Old White. :)  Each piece got two coats of paint, a coat of clear wax, some distressing, and then a little more wax.  I spray painted the hardware white, but first cleaned it well and primed it with spray primer.  The amazing thing about this paint was that I still had about 1/4 can of Duck Egg and 3/4 can of Old White left when I was done!  It goes A LONG way!  Unfortunately, I decided to paint my cheap Target bookcase with the Old White and it sucked up everything I had left.  I think next time I'll save the paint for furniture I actually like.


Painting the furniture with ASCP was so much fun!  No priming, dries in no time, no stinky paint smell- I decided that the paint was worth the money purely based on entertainment value!  I can't wait to paint something else!

I'd still like to add some art on the wall behind the nightstand, a new light fixture, some kind of flowy curtains, and something above the dresser, but I love how far it's come!  I'm trying not to move myself in!


Related projects:
Glass Float Inspired Vase (It's in there just somehow not pictured!)


Jenny
Linking up to...

Positively Splendid It's OVerflowing I Heart Nap ime Poofy Cheeks
My Uncommon Slice of Suburbia Tip Junkie handmade projects Furniture Feature Fridays

Big Clipboard to Chalkboard

Here's a little before and after of the big clipboard on my mantel.  It started as a well loved artist's clipboard from Goodwill.  There were actually two of them when I bought it and now I'm mad that I didn't buy them both!  At the time I had no idea what I was going to do with the first one though, so it seemed silly to have two.  It was in the garage for awhile being used as a dust pan, so you can see that it's come a long way.


The makeover consisted of a good scrubbing and a few coats of chalkboard paint. Pretty simple! I love that I can use it for chalk art, or to display photos, kid art or other fun decor.  

Jenny


Linking up to...
Photobucket The Shabby Nest

Monogrammed Doormat

Part of the reason I love DIY is because I can personalize my decor.  When it came time to buy a doormat for our front door, I really wanted one with our last initial.  Of course Pottery Barn sells them for $60, but I thought, how hard can it be??  I found many tutorials online, but I liked the look of this one from Random Thoughts of a Supermom. 

This project was pre-Silhouette, so to make the stencil I printed a W onto card stock and cut it out.  I taped the stencil to the corner of the doormat, and used black acrylic paint and a stencil paint brush to dab the paint on.  The doormat was from World Market.  Here it is with my spring wreath.


I love the simplicity of it.  These photos show the doormat after 6 months of use, so you can see that it looks as good as new! Because our porch is covered, the doormat hasn't gotten wet, and placing the monogram off center also helps keep shoes from wearing it away.   I think spray paint would be a good option if you needed it to be more weatherproof. 

Personalized decor is the best, and it's even better when you can do it yourself!


Jenny
Linking up to...
Tip Junkie handmade projects Craft & Tell <center><a href="http://www.uncommondesignsonline.com/"><img border="0" src="http://i1140.photobucket.com/albums/n575/beuncommon/UncommonlyYoursLinkParty.jpg"/></a></center>