
Camille's room has been window coverless ever since we moved. We debated a variety of different covering options, although I knew I wanted some type of curtain no matter what. Her window is 8 feet wide and almost as tall as the walls in the room (including the woodwork). When I started shopping curtains I quickly discovered that I would need a double width panel on each side just to be able to close them, and that started looking pretty expensive. Not to mention that I wasn't thrilled with my options. The answer was obvious- I was going to have to make the curtains. Luckily, while researching curtain making tutorials, I came across this fantastic one by Miss Mustard Seed. Lining the curtains was important for her room for both extra light blockage (she's not really an early riser so we didn't necessarily need blackout panels), and because her window is one of the first things you see when looking at our house. I love that MMS describes them as like a big pillow case because that's my kind of sewing!
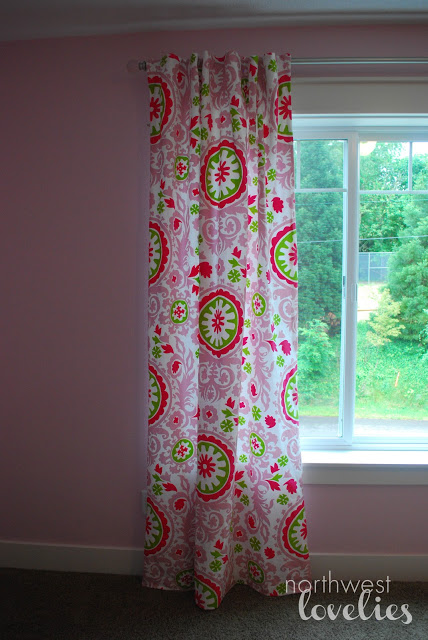
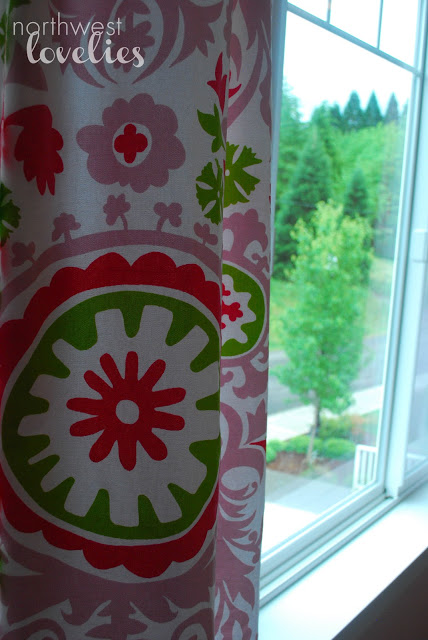
I thought I would end up using a subtle fabric like a small polka dot or something similar, but when I saw this Premier Prints Suzani in Maggie/Candy Pink I knew it was the one. I love that it's a home decor fabric, so it's a nice weight.
To make these I started by cutting my fabric off the BIG roll they sent me (I bought extra for another project). I measured 6 inches longer than I actually needed. This is where I ended up having an issue. I washed the fabric (and air dried) after I cut it and guess how much it shrunk?? SIX INCHES! Uh oh. I will definitely keep this in mind when I make the curtains for Lila's room!
I used the cheapest white twin flat sheets I could find as the liners. I ended up cutting a few inches from one side to match the size of the curtain fabric. Before I washed the fabric, the sheets were a few inches shorter than the curtains, which was fine, but in the end, they were slightly longer. Just a small hiccup in the plan.
I pinned them right sides together and started sewing. I sewed the two sides and top together and left the bottom open so I could determine how much (if any!) I would be able to hem. The hemming ended up being super tricky because they were basically the exact right length unhemmed. :( Unfortunately the ends were rough and stringy, and the liner was longer than the curtain fabric, so they definitely needed to be finished! I ended up using the smallest possible hem, and they just barely hang above the ground. Our carpet is kind of fluffy, so maybe that helps. :) I also steamed them after I put them up, so that may have helped too!

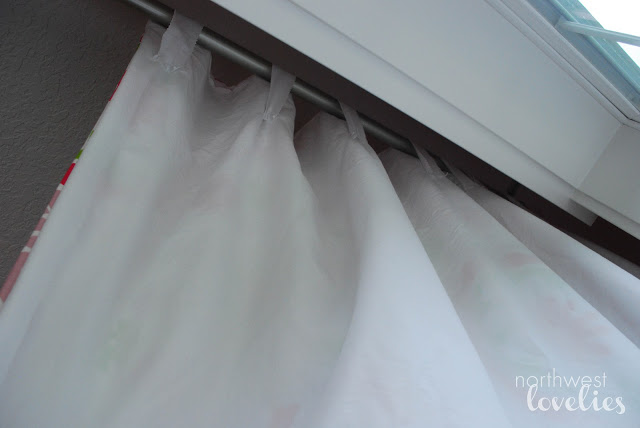
I really wanted these to be back tab curtains, so I found a tutorial somewhere on using iron on hem tape to create the tabs. I didn't think about it until I got to that point, but I realized that having the tabs only ironed onto the liner would probably make the curtains hang funny. I needed an easy solution (not a confident seamstress!) so I cut strips from the leftover sheets with my pinking shears and hand sewed them about every 10 inches or so across the top of the liner. I used an invisible stitch, so you can't see it from the front.
I'm pretty happy with how my first curtains turned out! They only took me two days to make which really surprised me. In the end I used about 5 yards of fabric at about $7 each and two $6 sheets, so the total came to $47. Not too bad for custom curtains! I'm excited to make another pair for Lila's room so I can use what I've learned and improve my technique! I'm also excited to start getting Camille's big girl room put together! Her bed should be here in a few weeks, so I need to shop bedding! :)

Other projects in this room:
Scrapbook Paper Dress Art
Pottery Barn Kids Inspired Art
Ribbon Trimmed Mirror


I thought I would end up using a subtle fabric like a small polka dot or something similar, but when I saw this Premier Prints Suzani in Maggie/Candy Pink I knew it was the one. I love that it's a home decor fabric, so it's a nice weight.
To make these I started by cutting my fabric off the BIG roll they sent me (I bought extra for another project). I measured 6 inches longer than I actually needed. This is where I ended up having an issue. I washed the fabric (and air dried) after I cut it and guess how much it shrunk?? SIX INCHES! Uh oh. I will definitely keep this in mind when I make the curtains for Lila's room!
I used the cheapest white twin flat sheets I could find as the liners. I ended up cutting a few inches from one side to match the size of the curtain fabric. Before I washed the fabric, the sheets were a few inches shorter than the curtains, which was fine, but in the end, they were slightly longer. Just a small hiccup in the plan.
I pinned them right sides together and started sewing. I sewed the two sides and top together and left the bottom open so I could determine how much (if any!) I would be able to hem. The hemming ended up being super tricky because they were basically the exact right length unhemmed. :( Unfortunately the ends were rough and stringy, and the liner was longer than the curtain fabric, so they definitely needed to be finished! I ended up using the smallest possible hem, and they just barely hang above the ground. Our carpet is kind of fluffy, so maybe that helps. :) I also steamed them after I put them up, so that may have helped too!
I really wanted these to be back tab curtains, so I found a tutorial somewhere on using iron on hem tape to create the tabs. I didn't think about it until I got to that point, but I realized that having the tabs only ironed onto the liner would probably make the curtains hang funny. I needed an easy solution (not a confident seamstress!) so I cut strips from the leftover sheets with my pinking shears and hand sewed them about every 10 inches or so across the top of the liner. I used an invisible stitch, so you can't see it from the front.
I'm pretty happy with how my first curtains turned out! They only took me two days to make which really surprised me. In the end I used about 5 yards of fabric at about $7 each and two $6 sheets, so the total came to $47. Not too bad for custom curtains! I'm excited to make another pair for Lila's room so I can use what I've learned and improve my technique! I'm also excited to start getting Camille's big girl room put together! Her bed should be here in a few weeks, so I need to shop bedding! :)
Other projects in this room:
Scrapbook Paper Dress Art
Pottery Barn Kids Inspired Art
Ribbon Trimmed Mirror